vim配置&操作
单个命令:
x: 删除当前光标所在的一个字符
p: 粘贴
hjkl: 移动光标(左下上右)
d: 删除 (dd就是删除一行)
a: 在光标后插入
o: 在当前行后插入一个新行
O: 在当前行前插入一个新行
0: 到行头
^: 到本行第一个不是空格字符的位置
$: 到本行行尾
/pattern: 搜索pattern的字符串(按n键到下一个匹配的字符串)
u: 后退修改
ctrl+r: 前进修改
G: 到最后一行
w: 到下一个单词的开头
e: 到下一个单词的结尾
%: 匹配当前括号对应的另一半(首先得把光标移动到括号上)
*: 匹配光标所在的单词的下一个
#: 匹配光标所在的单词的上一个
y: 拷贝 (yy就是拷贝一行)
f: (fa)查找下一个字符(a)所在位置 (F查找上一个)
t: (t,)查找下一个字符(,)前面位置 (T查找上一个)
v: 可视化模式 (va包含要范围—闭区间,vi不包含范围—开区间)
ctrl+v: 块操作
ctrl+n/ctrl+p: 在insert模式下,自动补齐
:split: 创建分屏
:vsplit: 创建垂直分屏
ctrl+w 方向键/hjkl: 切换分屏
ctrl+w -/+: 增减高度
ctrl+w </>: 增减宽度
ctrl+w _/|: 最大化高度/宽度
:[vertical] res[ize] -/+ N: 高度/宽度 减少/增加 N
=: 要求缩进
组合:
cw: 替换从光标所在位置到一个单词结尾的字符
gg: 到第一行
g_: 到本行最后一个不是空格的位置
gU: 变大写
gu: 变小写
vim vundle
vundle是vim的插件管理工具,它能够搜索、安装、更新和移除vim插件,再也不需要手动管理vim插件。
安装
- git clone https://github.com/VundleVim/Vundle.vim.git ~/.vim/bundle/Vundle.vim
配置Vundle:修改
~/.vimrc文件1
2
3
4
5
6
7
8
9
10
11
12
13
14
15
16
17
18
19
20
21
22
23
24
25
26
27
28
29
30
31
32
33
34
35
36
37
38
39
40
41
42
43
44
45
46
47
48
49
50
51
52
53
54
55
56
57
58
59
60
61set nu! " show line number
set autoindent " vim使用自动对齐
set tabstop=2 " set a tab = N spaces
set shiftwidth=2 " set 换行缩进的空格数
set expandtab
:%retab! " 用space来替代tab
set colorcolumn=100 " 设置多少宽度出现竖线(代码规范)
set nocompatible " be iMproved, required
filetype off " required
" set the runtime path to include Vundle and initialize
set rtp+=~/.vim/bundle/Vundle.vim
call vundle#begin()
" alternatively, pass a path where Vundle should install plugins
"call vundle#begin('~/some/path/here')
" let Vundle manage Vundle, required
Plugin 'VundleVim/Vundle.vim'
" The following are examples of different formats supported.
" Keep Plugin commands between vundle#begin/end.
" plugin on GitHub repo
" Plugin 'tpope/vim-fugitive'
" plugin from http://vim-scripts.org/vim/scripts.html
" Plugin 'L9'
" Git plugin not hosted on GitHub
" Plugin 'git://git.wincent.com/command-t.git'
" git repos on your local machine (i.e. when working on your own plugin)
" Plugin 'file:///home/gmarik/path/to/plugin'
" The sparkup vim script is in a subdirectory of this repo called vim.
" Pass the path to set the runtimepath properly.
" Plugin 'rstacruz/sparkup', {'rtp': 'vim/'}
" Install L9 and avoid a Naming conflict if you've already installed a
" different version somewhere else.
" Plugin 'ascenator/L9', {'name': 'newL9'}
Plugin 'scrooloose/nerdtree'
Plugin 'mattn/emmet-vim'
" All of your Plugins must be added before the following line
call vundle#end() " required
filetype plugin indent on " required
" To ignore plugin indent changes, instead use:
"filetype plugin on
"
" Brief help
" :PluginList - lists configured plugins
" :PluginInstall - installs plugins; append `!` to update or just :PluginUpdate
" :PluginSearch foo - searches for foo; append `!` to refresh local cache
" :PluginClean - confirms removal of unused plugins; append `!` to auto-approve removal
"
" see :h vundle for more details or wiki for FAQ
" Put your non-Plugin stuff after this line
" NERDTree shortcut
map <C-n> :NERDTreeToggle<CR>插件安装:
3.1 首先知道所需插件,vundle提供了PluginSearch命令来查找匹配的插件,eg.PluginSearch foo
3.2 如果用PluginSearch命令找到了所需插件,则可以用i键来安装插件, eg.:1
2
3
4
5"Keymap: i - Install plugin; c - Cleanup; s - Search; R - Reload list
"Search results for: foo
Plugin 'MarkdownFootnotes'
Plugin 'VimFootnotes'
Plugin 'foo.vim'安装好之后还是要在
.vimrc文件配置插件源。
3.3 如果直接知道插件源在哪,可直接在.vimrc文件中配置(配置规则遵守第2步),然后用PluginInstall安装
3.4 设置插件开关的键映射,在.vimrc文件的最后加入配置语句。例如NERDTree插件:1
2" NERDTree shortcut
map <C-n> :NERDTreeToggle<CR>
内容折叠
折叠方式
折叠方式的定义是设置:set fdm=XXX
有6中方法来选定折叠:
- manual 手工定义折叠
- indent 更多的缩进表示更高阶别的折叠
- expr 用表达式来定义折叠
- syntax 用语法高亮来定义折叠
- diff 对没有更改的文本进行折叠
- marker 对中文的标志折叠
Note: 可以在VIM中输入:set fdm=XXX来设置,或者修改.vimrc文件来让每次打开vim时折叠都生效
折叠命令
zc 折叠
zC 对所在范围内所有嵌套的折叠点进行折叠
zo 展开折叠
zO 对所在范围内所有嵌套的折叠点展开
[z 到当前打开的折叠的开始处。
]z 到当前打开的折叠的末尾处。
zj 向下移动。到达下一个折叠的开始处。关闭的折叠也被计入。
zk 向上移动到前一折叠的结束处。关闭的折叠也被计入。
全局搜索并跳转
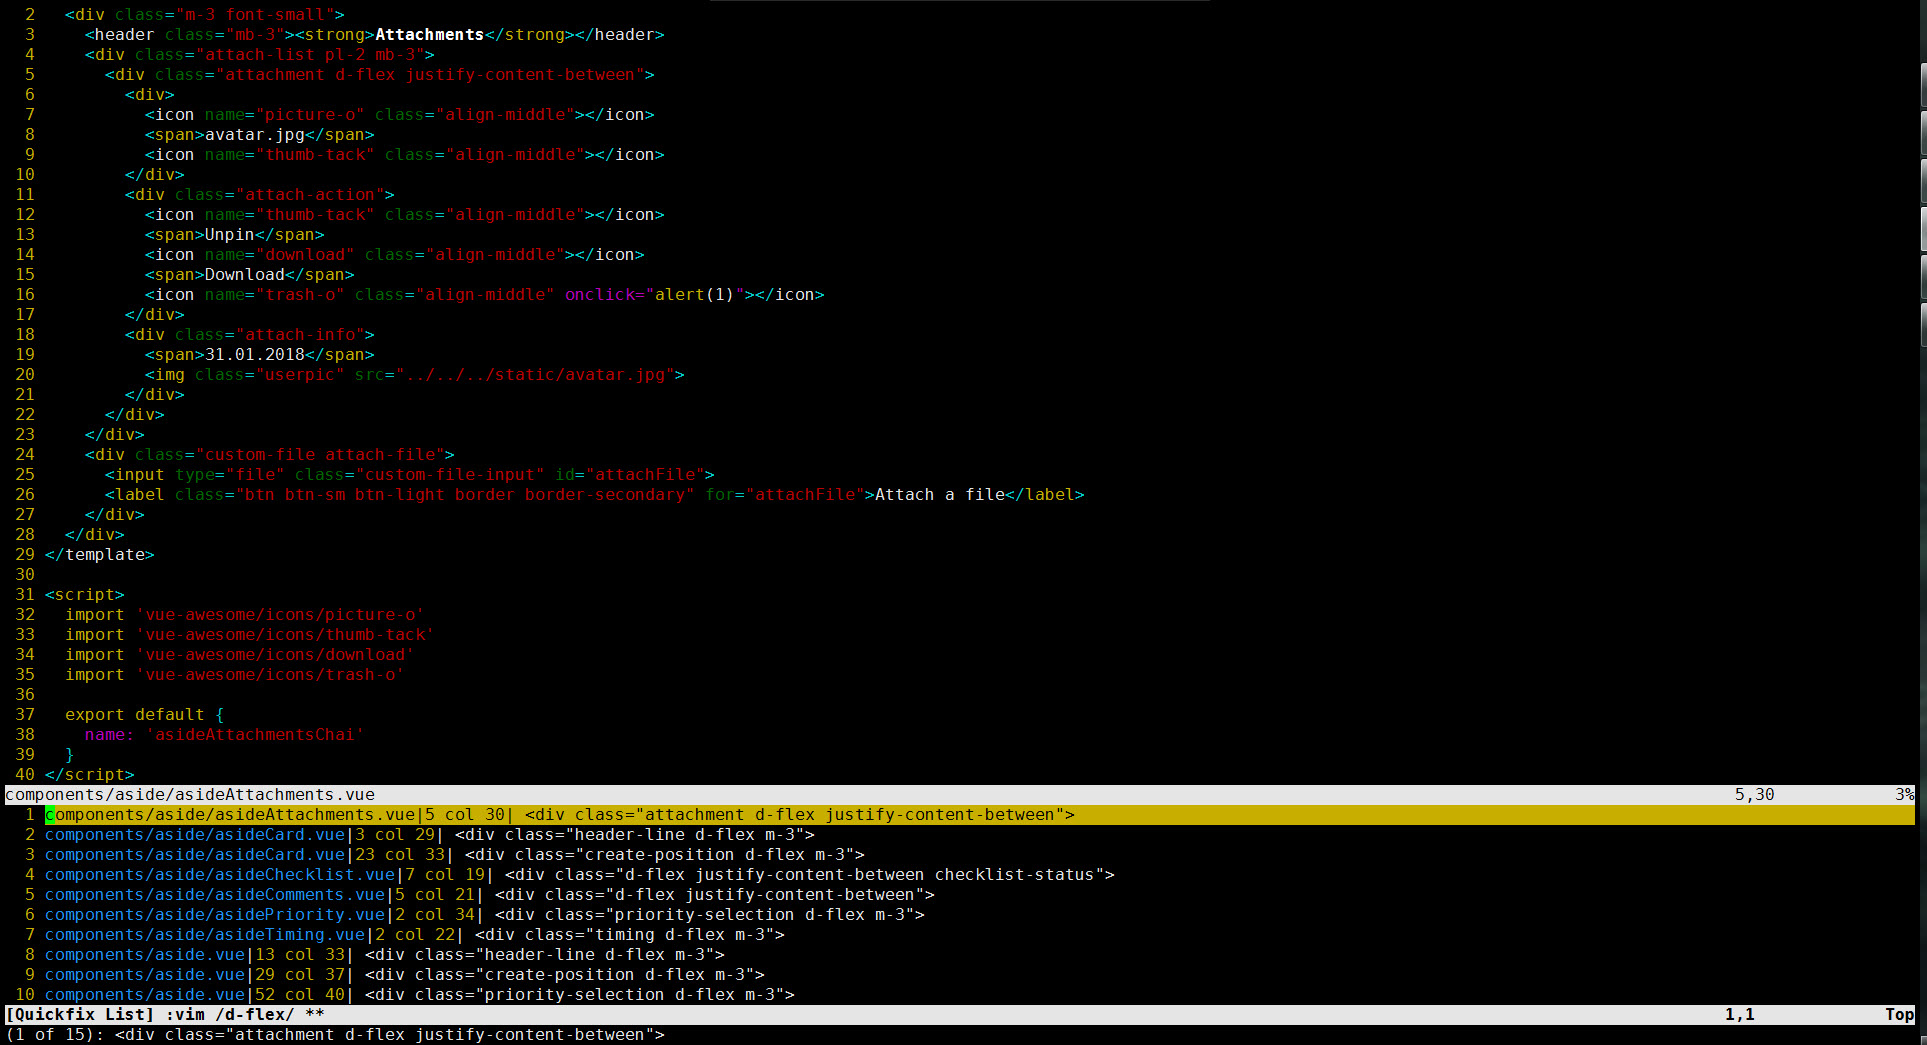
在vim的命令模式下输入如下命令:vim /test1/ ** | copen,就会在当前目录下递归找出所有包含test1字符串的文件,
并且点击想查看的那行就能直接跳转到这个文件包含test1的位置中去。

上述例子是当前目录递归搜索所有,列出的全部文件,点击想要看的一行就直接跳转到这个文件相应行中。
除此之外,这个命令还有一些变种用法:
- 只搜索当前文件:
vim /test1/ % | copen - 只搜索当前目录:
vim /test1/ * | copen - 搜索上级目录下,并递归:
vim /test1/ ../** | copen - 可以在多个路劲中搜索:
vim /test1/ path1/** path2/** | copen