gitlab-ci基础配置
之前写过一个“在vps上搭建一个git仓库并实现代码提交之后自动部署到nginx上”,
但是这个需要自己去维护git hook钩子触发的脚本,而且每次push之后都只能在本地的terminal中看到脚本的执行情况。
其实我们可以使用gitlab-ci来完成我们需要的东西。
使用gitlab
使用gitlab-ci来完成自动部署的第一步当然是使用gitlab。
当然可以自己搭建gitlab仓库,不过我用了官方 gitlab
创建自己的项目
页面上点击New project,然后输入项目名称就ok了。
配置.gitlab-ci.yml文件
要使用gitlab-ci,需要在项目中配置.gitlab-ci.yml文件。
关于这个文件的编写规则可以参考:Configuration of your jobs with .gitlab-ci.yml
简述下我的理解:
- 全局关键字:
- image:指定特定的运行版本;例如
image: node:latest - stages:定义将被使用的运行阶段;一般分为三段:
build,test,deploy;如果未定义那这三个都相当于存在;阶段的顺序是从build到test到deploy;相同阶段的job会并行执行;前一阶段错误将直接把commit标记为failed并且中断后续job的执行; - cache: 指明在所有
job之间的默认的共享文件、文件夹;如果job配置了cache,则会使用配置的cache,忽略全局的cache
- image:指定特定的运行版本;例如
job内部关键字- stage:定义当前
job所在的阶段;值从全局stages里面取一个 - script:定义要执行的脚本;可以多个,每个另起一行用
-开头;(每个job都必须存在script) - tags:用来知名特定的
Runner来跑当前job(很关键,弄很久才知道这个是最重要的,不然pipelines会一直处于pending状态,因为没有特定的runner来执行这个job) - only:分支名(指明那个分支会跑当前
job) - except:分支名(指明那个分支不跑当前
job) - cache:指明在不同
job之间的共享文件、文件夹;- paths:目录;可以多个,每个另起一行用
-开头; - key:如果你在不同的
job共享了不同的目录,那么你就需要key来防止cache被覆盖 - untracked:设置是否缓存未添加到git管理的文件
- policy:默认的
policy是pull-push的,也就是在job执行前下拉缓存,结束后保存缓存;可以设置成pull,既只读取缓存
- paths:目录;可以多个,每个另起一行用
- artifacts:指明在
job成功完成之后可以在gitlab上面下载到的文件(意思就是:指定的文件会被上传到gitlab,然后可以在
当前Pipeline中下载这些文件)- paths:指定上传的目录;可以多个,每个另起一行用
- dependencies:应该和
artifacts一起使用,来在不同的job间共享artifacts文件。(原理是,某个job配置了artifacts之后,job如果执行成功,就会把对应的文件上传到gitlab;同时,配置了dependencies的job会在脚本执行前去gitlab下载对应的job的artifacts文件);当然,依赖只能按照stages运行阶段来依赖前一个阶段的job
- stage:定义当前
这里贴一个简单的demo:1
2
3
4
5
6
7
8
9
10
11
12
13
14
15
16
17
18
19
20
21
22
23
24
25
26
27
28
29
30
31
32
33
34
35
36
37
38
39image: node:latest
cache:
paths:
- node_modules
prepare:
stage: build
tags:
- build
script:
- npm install
only:
- master
testCache:
stage: test
tags:
- build
script:
- cd node_modules
- pwd
only:
- master
production:
stage: deploy
tags:
- build
script:
- npm run build
- mkdir .public
- cp -r dist/* .public
- mv .public public
artifacts:
paths:
- public
only:
- master
到这,gitlab上的配置就基本OK了。
接下来,我们需要去服务器上安装gitlab-runner来运行我们定义的job了。
使用gitlab-runner
其实具体的安装和使用说明,在gitlab上有很详细的文档。
在项目首页,点击左侧setting里面的二级菜单CI / CD。找到Runners,点击右边的Expand按钮。
找到下面Set up a specific Runner manually的文档。
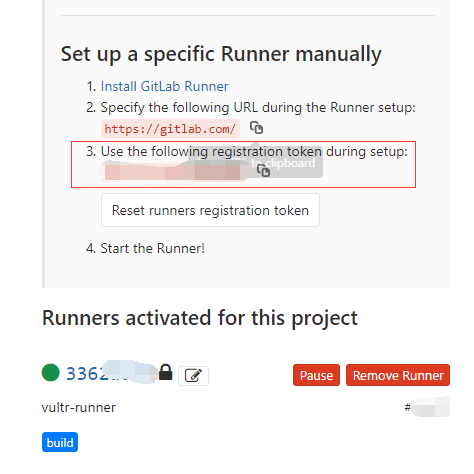
Note:也可以直接看下面的内容。
安装gitlab-runner
这里是在linux上安装gitlab-runner。
下载合适的版本
1
2
3
4
5
6
7
8
# Linux x86-64
sudo wget -O /usr/local/bin/gitlab-runner https://gitlab-runner-downloads.s3.amazonaws.com/latest/binaries/gitlab-runner-linux-amd64
# Linux x86
sudo wget -O /usr/local/bin/gitlab-runner https://gitlab-runner-downloads.s3.amazonaws.com/latest/binaries/gitlab-runner-linux-386
# Linux arm
sudo wget -O /usr/local/bin/gitlab-runner https://gitlab-runner-downloads.s3.amazonaws.com/latest/binaries/gitlab-runner-linux-arm修改执行权限:
sudo chmod +x /usr/local/bin/gitlab-runner- 创建Gitlab CI用户:
sudo useradd --comment 'GitLab Runner' --create-home gitlab-runner --shell /bin/bash 安装和运行服务:
1
2
sudo gitlab-runner install --user=gitlab-runner --working-directory=/home/gitlab-runner
sudo gitlab-runner start注册Runner:
sudo gitlab-runner register1
2
3
4
5
6
7
8
9
10
11
12
13Please enter the gitlab-ci coordinator URL (e.g. https://gitlab.com )
https://gitlab.com
Please enter the gitlab-ci token for this runner
xxx (PS: 就是在【Set up a specific Runner manually】的文档中的registration token)
Please enter the gitlab-ci description for this runner
[hostame] my-runner
Please enter the gitlab-ci tags for this runner (comma separated):
my-tag,another-tag (PS: 这个是最关键的,这个tag和job中的tags要对应才能起作用!!!当然你可以在gitlab中指定它不去匹配)
...successful
Note: 还是一句话,注册Runner时输入的tag要和.gitlab-ci.yml文件中job的tags对应起来。
到这里,gitlab-ci就可以使用了。提交一次试试~~